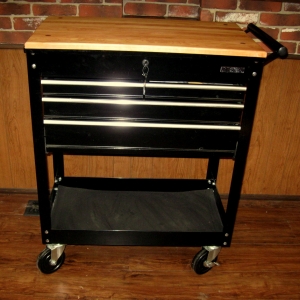
We developed this easy-to-make kitchen island because it is a great and economical solution for a small kitchen,with its butcher-block cutting board top and plenty of storage space. Because it is on wheels it can be moved around or even just moved out of the way when needed. It is incredibly sturdy and adds a sleek, modern look to any kitchen. We have seen similar-sized freestanding kitchen islands with butcher-block tops for anywhere from $300 to $700. The total cost of materials for this project is under $175. The DIY savings on this project is between $150 and $550!
Amazing Rolling Kitchen Island
How-To Guide
Step-by-Step Instructions to accompany the video “Make An Amazing Rolling Kitchen Island”
Materials Needed:
For the Cutting Board Work Surface:
(4) Pieces of Maple, dimensions: 3/4″ x 1 1/2″ x 8′ (Alternative types of wood that can be used are walnut or cherry)
Water Proof Wood Glue (Recommended brand: Titebond III)
Mineral Oil
(1) Hardwood Dowel, 1″ in diameter
(4) 5/16” Nylon Locking Nuts with corresponding Hex Bolts 5/16” x 1” and Washers
(4) Scrap pieces of lumber, 19″ each in length
Sandpaper in various grits: Coarse, Medium and Fine
Clean Rags
Packing Tape
Paint Brush or small roller
For the Rolling Tool Cart:
(1) Four-drawer tool cart, as shown in the picture above of the finished cart. (Note: See Jane Drill used the harbor freight tool cart, priced at $119.00 on sale. Click the link or visit your local Harbor Freight store to see this cart http://www.harborfreight.com/580-lb-capacity-four-drawer-tool-cart-95659.html
Tools Needed:
(1)Power Drill (cordless or corded)
(1)Circular Saw
(7) Clamps in various sizes: (3) large (they must be able to span the width of the project -18”), and (4) clamps appropriately sized to squeeze and level the project.
(2) Drill Bits, including: (1) Paddle Bit, 1″inch in Diameter, and (1) Titanium Bit 5/16”
(1) Ratchet Set
(1) Adjustable Wrench
(1)Random Orbital Sander or Finish Sander
(1)Bench Plane
(1)Wood Chisel, Scraper or Safety razor (to remove dried glue from cutting board surface)
(1)Hammer
(1)Pencil
(1) Black Marker
Optional:
(Note:)These items are not necessary to create the cutting board, however, they will make the job easier.)
(1)Electric Multi-Tool with various attachments
(1)Electric Router and Round-Over router bit
(1) Center Punch
Step-by-Step Assembly Instructions
Step 1: Assemble the tool cart per manufacturer’s instructions, and set it aside until you get to Step 6.
Step 2: Cut the pieces of maple so you end up with 12 pieces with a length of 32 and 5/8” each
Step 3: Wrap the 4 pieces of scrap lumber in packing tape. Make certain that each piece is completely encased in the tape.
Step 4: Line up the pieces of maple side by side and on their sides. Squeeze on a generous quantity of the wood glue. (Note: the last piece of wood requires no glue because it will be glued to the adjoining piece.) Then, spread out the glue with a brush or roller, being certain that there is complete coverage.
Step 5: One by one, turn each piece of wood over onto its wider side so that the pieces will be glued together on the narrow side where you have just applied the glue. Next, clamp the project width-wise across the width of the block with three large clamps, one near each end and one in the middle. (Make sure it is snug, but do not tighten the clamps so much that you are unable to make adjustments later.) Next, place two of the pieces of scrap wood (that are encased in the packing tape) beneath the project, one on the right and one on the left, and then the remaining two pieces on the surface of the project, right above the two pieces that are under the project. Next you will be using your 4 remaining clamps, one on each corner of the project. One by one, clamp together the two pieces of the scrap wood that are above and below the project with the project sandwiched between them. So the project should now be clamped across the width in 3 places, and clamped between four pieces of scrap. Adjust all clamps until they feel tight and secure, and so that the maple pieces are snugly clamped together and the surface is level. Let the project sit undisturbed for 24 hours.
Step 6: After 24 hours have passed, remove the clamps. Scrape off any surface glue with a safety razor, scraper or wood chisel. Plane the surfaces with a bench plane until cutting board surface is level, and then follow up by sanding the surfaces until smooth.
Step 7: Trim ends of the project where uneven with a circular saw. To make this cut, View the video, “How to Make a Perfectly Straight Cut Using a Circular Saw.” The final dimensions of the project should be 18” x 30”.
Step 8: Round off the perimeter edges of the cutting board top with a router equipped with a round-over bit. (Note: This can also be accomplished without a router by rounding the edges with an electric sander, however it will take longer)
Step 9: Remove any wood dust from cutting board surfaces, and then with a clean cloth, apply a generous coat of mineral oil to the top and bottom of the project. Allow the oil to absorb overnight. Buff the surface of the project with a clean cloth, and then apply a second coat of the mineral oil.
Step 10: Drill 4 holes in each corner of the cutting board surface with a 1” spade bit, to a depth of 3/8 inch. Next, then drill a hole in the center of each spade bit opening with a 5/16”drill bit. This hole should accommodate the circumference of the bolts which you will be using to attach the cutting board surface to the top of the rolling base.
Step 11: Center the cutting board atop the rolling base. Take a black marker (a sharpie is best), and put it through each of the drilled holes in the cutting board to make a mark on the top of the metal base were you will be drilling a hole to accommodate the bolts. Put the cutting board aside, and drill the holes in the metal base where you made the marks, using a titanium 5/16” drill bit. Be careful and take your time. Starting the drilling process at a slow speed will help to prevent the tip of the drill from skating. You may also want to consider using a center punch prior to drilling, as this tool creates an indentation in the surface which helps to prevent the drill bit from slipping.
Step 12: Place the cutting board on top of rolling base. Line up the holes in the cutting board with the holes in the base. Insert each of the four washers and bolts, attach the nylon locking nut below, and tighten the nut. Use a ratchet to ensure each bolt is secure. Next, cut four slices off the wooden dowel to the appropriate thickness to fit into the openings of the countertop and hide the bolts. Insert the wooden dowels into each opening. If the wooden dowels do not fit flush with the counter top, sand the dowel tops until they are level with the cutting board surface.
Step 13: With a clean cloth, apply 1 or 2 additional coats of mineral oil to the cutting board surface. Once the oil is absorbed, buff the surface of the wood top between coats with a clean dry cloth.
And that is it! You have just made an amazing Rolling Kitchen Island!


Leave A Comment