 How to Repair a Textured Wall or Ceiling. Repair a textured wall (or ceiling) quickly and easily with our easy how-to guide, which accompanies the video “How to Repair a Textured Wall or Ceiling With Amazing Results“
Time needed to complete project: Varies, due to factors such as the size of job and the drying time of the joint compound you are using
Materials Cost: Nominal
Notes: These instructions and the corresponding video describe the general process of making a repair in a textured wall or ceiling, as well as how to repair 3 different types of texture: Spanish (also called Skip Trowel), Swirl and Slap Brush.
Tools and Materials Needed
• All-purpose pre-mixed joint compound or a dry mix joint compound, or both
• Piece of drywall that is larger than the hole you will be repairing, and is the same thickness as the drywall to be repaired
• Container of warm water (which assists in removing existing joint compound)
• Container of clean cool water (for mixing with joint compound)
• Pencil
• Paintbrush
• Tape Measure
• Utility Knife (make sure the blade is very sharp)
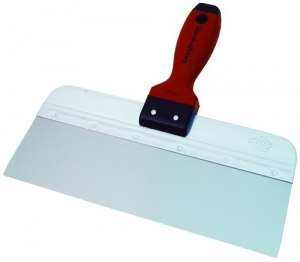
• Plastering tools of varying sizes, such as a taping knife and/or a finish trowel (margin trowel is optional)
• Keyhole saw (optional)
• Stiff bristle brush (if you are repairing a swirl texture)
• Rubber gloves (if you are repairing a slap brush texture)
• Paint Roller (appropriate sized nap to duplicate drywall stipple where needed)
Step-by-Step Instructions for Making the Repair
1. Brush warm water around the hole to be repaired. Make sure to spread out about 3 inches beyond the hole. Let it set for about 5 minutes, and then brush some more warm water over the area.
2. After the texture has softened a bit, knock down the texture with your taping knife until it is nice and smooth. Be sure to take out all the ridges.
3. Prepare your piece of drywall and area that you will be repairing. To review the instructions on how to do this, watch the video “How to Repair Large Holes in Drywall” to learn two methods of making a repair in a large area of drywall. Please note that the second method shown (the “California patch”) is only suitable for walls…if you are making your repair in a textured ceiling, you will need to use the first method shown in the video.
4. Fold back the paper lip of the patch, and place the patch over the hole in the drywall.
5. Trace around the patch with your pencil to create a template to cut the hole in the drywall into a square.
6. Using either a keyhole saw or a utility knife, cut out the drywall around the perimeter, where you have drawn the square.
7. Clean up the jagged pieces of drywall by pushing them into the hole.
8. Dry-fit your patch to be sure that it fits, before applying the joint compound.
9. Apply the joint compound to the wall. Put a little bit around the edge and into the cavity. Then put a nice heavy coat on the wall around the hole.
10. Insert your patch, and lay down the edges of the patch with your tool so that they are nice and flat.
11. Allow the first coat to dry, and then apply more joint compound, focused more on the center of the patch.
12. Lay down the edges as flat as you possibly can.
13. Once the joint compound has dried, follow the instructions for your particular type of texture below.
Repairing a Spanish or Skip Trowel Texture
14. Although a Spanish texture is usually applied by a trowel, a regular trowel may be too large to repair a small patch, so, you can use a margin trowel or a similarly sized tool in this instance.
15. Put a small amount of joint compound on your trowel.
16. Holding the trowel so that it is almost flat with a slight angle against the wall or ceiling, begin covering your patch, all the way to the edge of the repaired area.
17. You may also want to go beyond the patch area just a bit with spaced, random trowel strokes, so that it blends better with the surrounding surface.
Repairing a Swirl Texture
Note: It is highly advisable that in addition to reading the instructions below, you watch the video to be able to see the technique used in repairing a swirl texture, as it is difficult to adequately describe this method in words.
18. For this texture, you need to be sure that your patched area is nice and smooth.
19. Scrape down any ridges with your taping knife.
20. Brush on a little bit of water around the edges of the repaired area and slightly beyond it.
21. Brush on your texture (which is regular joint compound with just a little bit of water mixed in to make it creamier). Go just a little bit beyond the edges of the repaired area.
22. For this repair, you will need to put in the design with a stiff bristled brush. Choose a brush that is about the same width as the width of the swirls in the existing texture.
23. Starting in the upper right corner, blend in the texture by moving your brush from right to left in a “fan” motion, going from the dry area into the wet area. Continue on into the pattern, again moving from right to left. When you get to the other side of the area to be repaired, you will need to change direction, again going from dry to wet, but this time from left to right in a fan pattern. To pick up the rest of the pattern from the bottom, follow the ridges of the pattern, going again from dry to wet. Make sure for this last section that you remove as much joint compound from your brush as you can before you begin making your swirl.
Repairing a Slap Brush Texture
24. For this texture, you don’t need a smooth patch, as the texture itself is very rough.
25. You will want to roll the texture on with a paint roller with an appropriately sized nap (nap is the thickness of the roller sleeve). Roll it on thick enough to match the existing texture’s thickness.
26. Don a rubber glove, and create the texture by “slapping” your hand against the joint compound. For the first round, you can use a flatter hand. For the second and final time, lift your fingers so that you are creating the texture with just your palm. You may also use a stipple or stucco brush to create this pattern.
And that is all it takes to repair a textured wall or ceiling, so that no one would ever know it was damaged. You can do this!
By See Jane Drill, Copyright 2014
Click HERE for Printable Version of Instructions



when repairing a hole in the drywall..you show using warm water around the hole to help smooth out surface what do you do when the hole is in a painted wall? Would this still work? I have a painted wall that I have to fix. Please advise.
Hi Jayne, yes the technique will work, as long as it is a latex-based paint (not oil). It isn’t quite as easy, and you will have to let it soak a bit more, but it will still work.
Hi, Can you tell me what type of dry mix joint compound you’d recommend? I just picked up sheetrock brand 90 setting-type joint compound and noticed that it says not to use it for skim coating. It doesn’t say why not. Should I try it or is there something else I should be using? I’m located in New Jersey. Thanks, in advance for any advice you can offer.
Jane,
IN the swirl repair you stated stiff bristle brush. Can you give me the brand and size you used?
Thanks