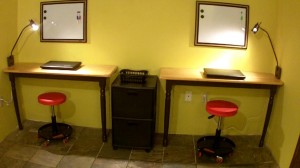
Watch this video to learn how to make not just one, but two! laptop desks by re-purposing an old wood table. Leah from See Jane Drill shows you just how easy it is to create this home office, which is a perfect solution for any small space, even if all you have to work with is a corner of a room. Check out our step-by-step instructions in the video below and in the attached written instructions, and you too can make two computer desks out of any old wooden table. You can do this!
Written Instructions
Tools & Materials Needed
- An old wooden table
- A circular saw
- A hand saw (in case the circular saw will not saw through the entire depth of the table top)
- A Power Drill (cordless or corded) with spade or paddle bit, and also a bit for drilling pilot holes
- Structural Screws
- Cabinet Screws
- Washers
- A wood dowel ( be sure to get one in the same diameter as your paddle bit)
- A level
- A pencil
- An electronic studfinder (optional, but recommended)
- A standard tape measure
- A piece of wood for the cleat. Be sure that it is long enough to cut in half and make cleats for two desks, if you are making two desks
- A piece of scrap wood, the same thickness as the cleat wood
- Finishing Supplies: Fine-grained sandpaper, primer and paint, stain or varnish (optional)
Step by Step Instructions
–Saw your table in half with the circular saw. To refresh your circular saw skills, refer to the videos “How to Operate a Circular Saw” and “How to Make a Perfectly Straight Cut in Wood with a Circular Saw.”
-Prepare the surfaces for painting and priming or re-finishing.
-When the surfaces are finished and dry, prop the half-table up against the wall with the cut side towards the wall. Make sure that the legs are solidly on the floor.
-Ensure that the table is level from front to back, by using your level along the right or left shorter side of the table.
-Once the table is in place, strike a line with your pencil along the top back side of the table. Do the same underneath the table. With the lower line, be sure to make a line along the sides, where the underside of the table comes down.
-Once your reference lines are done, you can remove the table from the wall for now.
-Using your stud finder, mark where the studs are along the wall.
-Hold your cleat up against the wall. It should be even with the lower reference line, and not be any longer than where those side lines come down on the left and right. This is very important, as you will need to be able to slide the table over the cleat later without interference from the cleat.
-Transfer the stud marks that you made on the wall to the same spots on the cleat.
-Drill your pilot holes with your drill and the appropriate bit.
-Position the cleat against the wall, ensuring that the pilot holes are lined up with the stud marks that are on the wall.
-Screw in your first structural screw into the cleat. Do not screw the first screw in all the way, as you will need to be able to pivot the cleat to position it to screw in the remaining screws. Screw in the remaining structural screws, and then tighten all of them securely.
-Position the table on top of the cleat.
-Using your level, ensure that the table is level from front to back.
-Now it is time to attach the table to the cleat.
-Be sure to space your screws evenly so that the appearance will be appealing to the eye.
-Using the scrap wood as a guide, make your marks on top of the table where you will be attaching the table to the cleat.
-Using your drill with the paddle bit, drill holes roughly 3/8″ deep, where you made your marks
-Using your drill with the bit for the pilot holes, drill pilot holes
-Screw in your cabinet screws (with washers)
-Cut slices from the dowel, and plug the holes to create a nicely finished appearance
Repeat the same process with the other half of the table to create a second laptop desk, if you are doing that.
And that is it!


