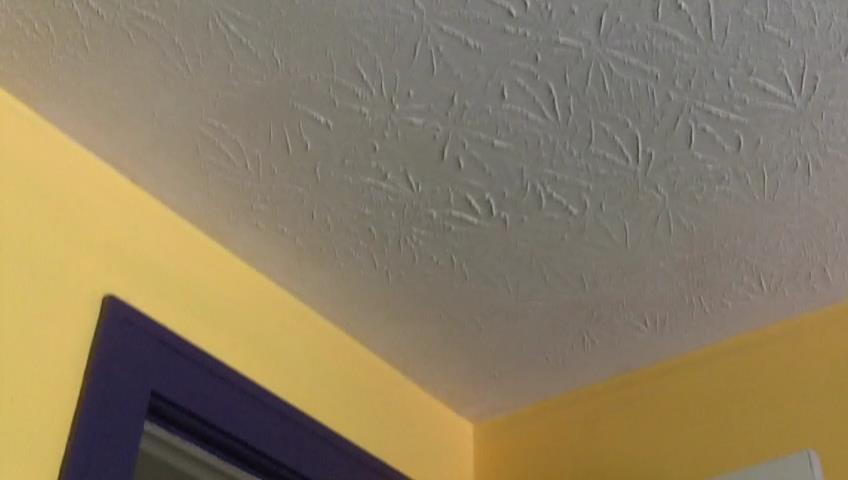
These written instructions and the accompanying video (Best and Fastest Way to Texture a Ceiling) show the quickest and easiest way to texture a ceiling or a wall. This a great technique to learn to cover up imperfections or just add an interesting pattern to the ceiling or walls of your home. You will be amazed at how well it turns out! Read on:
Tools and Materials Needed:
- Standard Paint Roller Handle
- Roller sleeve (the nap needs to be at least 1/2″ thick)
- Long-handled paint brush
- Specially made Texture Roller
in the pattern of your choice
- Joint compound
- 5 Gallon Bucket for mixing the joint compound
- Drill with a mixing wand attachment
Step-by-Step Instructions
- Mixing the joint compound. Mix the joint compound with water in a 5-gallon bucket, using the drill with the mixer wand attachment. You will want the consistency to be thin enough to roll on, about the consistency of a cake icing. If you want to get a better idea of what the consistency is, we show it in the accompanying video. Safety Tip: It is a good idea to stabilize the 5-gallon bucket by placing your foot along the rim before beginning the mixing.
- Submerge your paint roller, with cover attached, in the joint compound. You will want the roller completely covered with joint compound. Tap it on the rim of the bucket to shake off any excess.
- Roll the joint compound onto the ceiling, starting from a corner of the room. Note: You will want to work approximately 1/3 of the ceiling (no more than that) at a time, so that the compound doesn’t dry out in between stages.
- Distribute the compound evenly. After you get the compound on to 1/3 of the ceiling, go back over it again with the roller, to evenly distribute the joint compound, so that you don’t have thin spots in one area and thick in another.
- Remove the nap roller cover from the handle, and attach the texture roller cover. It is very important to note that you can only roll the texture roller in one direction, to create an even pattern.
- Starting from one corner of the room, roll the texture on. You should overlap your rows by approximately 1/2 an inch. Again, remember that you must always go in the same direction.
- Clean up any excess joint compound that may have ended up on the walls, with the paint brush, dipped in water.
And that is all it takes to texture a ceiling or wall!
By See Jane Drill, Copyright 2017, All Rights Reserved


I have watched you on several project. I truly appreciate your help to novice like me.